 USA
USA CANADA
 EUROPE


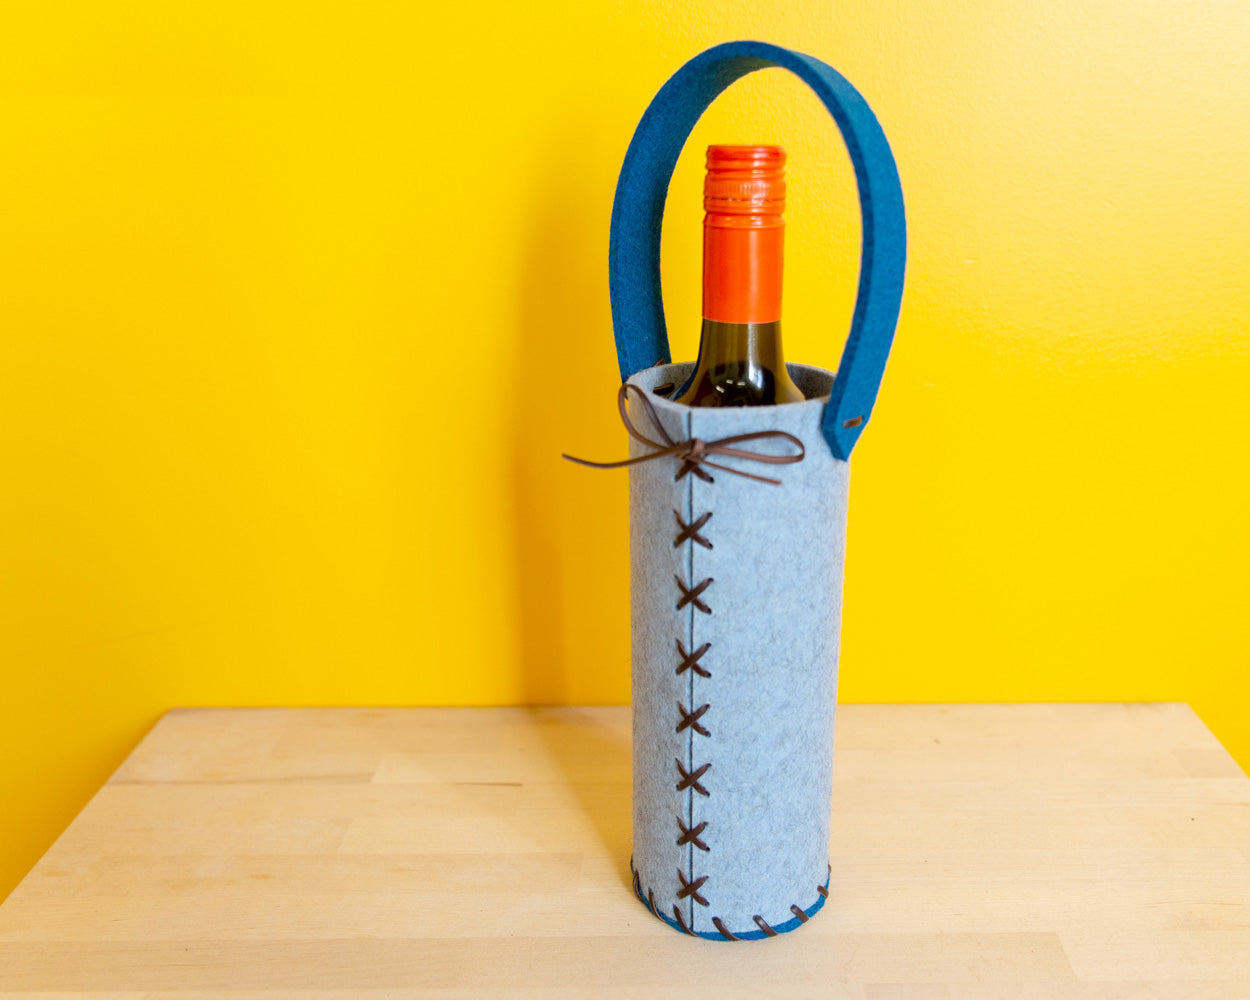
DIY Designer Wool Felt Wine Tote
Sturdy and colorful, this crafty Designer Wool Wine Tote will be the top conversation starter at your next gathering! Made from 5mm thick Designer Wool Felt and leather lacing, this project is a great way to use your felt remnants and create something unique and useful.
Wool Felt - especially thick wool felt - is amazing at regulating temperatures. If you want your white wines to stay chilled and crisp while you're out enjoying the summer weather, or if you want to keep the heat from your decadent reds, wool felt is the way to go. Follow this easy step-by-step tutorial to create your own lovely laced Wine Tote!
Materials Used:
- 5mm Thick 100% Wool Designer Felt
- Leather Lace or Cord
- Leather Hole Punch
- Rotary Cutter or Sharp Fabric Scissors
- Self-healing Mat
- Marking Tool (Pen, Marker, or Tailor’s Chalk)
- Stiff Ruler
- E6000 Craft Adhesive
Steps:
1. Cut out a rectangle with a minimum length of 10 inches; this size will fit a standard 750ml wine bottle. The height is up to you – our bottle carrier is about 8.5 inches tall leaving the neck of the bottle exposed.

2. Mark where the holes for your lacing will go on the side edges of the rectangle. We spaced ours at half inch intervals.
3. Punch out your holes where marked using your leather hole punch, checking to make sure the holes on both side edges line up.

4. Cut a length of leather cord long enough to lace the two sides of the rectangle together, making your cylinder base – our lace was approximately 48 inches long.
REMEMBER It is always easier to take away material then to add material. Always cut more than you think is needed if you are unsure of the exact length.

5. Use the bottom of your wine carrier as a size guide to mark and cut out a circle from your Designer Felt. This will be the bottom of your carrier.

6. Mark where the holes for your lacing will go on the edge of the circle and at the bottom edge of the cylinder. We spaced ours at half inch intervals.
7. Punch out your marked holes, checking to make sure they line up along both the circle and cylinder edges.

8. Instead of cutting a specific length of leather cord, loosely thread one end of the cord through the holes of the circle and cylinder attaching both pieces. Do not pull the cord tight yet – it’s easier to lace when you have space to fit your hand or finger in between the circle and the cylinder.
NOTE: If you lace the cylinder and the circle together on a slight angle like we have, the holes will not match each other perfectly along both edges.

9. Now pull the lacing tight, leaving a tail on either end. Tuck the tails into the holes to hide them, or slip them in between the circle and the bottom of the cylinder. The friction between the felt and the leather lacing is strong enough that no glue or knots are needed to secure the bottom of the carrier. Of course, if you would like to add a drop of E6000 to be sure that nothing slips out of place, do so!

10. Cut a strip of felt - 1 inch wide - that is long enough to act as a handle. Our wine carrier handle is approximately 13.5 inches long so that it goes over the bottle neck with enough space for your hand to hold it.
11. Punch two holes on each end of the handle. Place the handle where you would like it on the carrier, and with a pen or marker, use the holes on the handle as a guide to mark where to place your handles. Punch out holes where you’ve marked the carrier.
12. Lace leather cord through the holes, as shown in the photo below. Pull the cord tight, clip the long end of the cord, and tuck it between the handle and cylinder. Use a drop of E6000 craft adhesive in between the handle and cylinder to make sure everything stays in place.
OPTION: You can tie a knot on the outside of the handle instead of gluing, if you would like to completely cut glue from this project. It can be any knot you want, as long as it is knotted very tightly – leather lacing likes to unravel from knots that are too loose.


Now you have a gorgeous new creation to bring along to gatherings or the perfect reusable gift bag. This project can be altered in a lot of different ways - customize your personal wine tote and make sure to share pictures of your crafty carrying solutions by tagging us on social media.
If you have any questions regarding a specific product used in this article, please contact a customer service representative by emailing sales@thefeltstore.com or calling 1-866-757-3358.
Leave a comment