 USA
USA CANADA
 EUROPE


DIY Holiday Party Photo Props Tutorial
So, you have felt remnants and scraps leftover and have no idea what to make with all these odds and ends? Fear not, with the Holiday season right around the corner, we’ve dreamed up some cute DIY additions to any Holiday party you might be planning: our DIY Holiday Party Photo Props! These are great just on their own or go BIG and decorate a spot to use as backdrop with these super cute and fun holiday themed party photo props! Follow along and see how we made our Reindeer Antlers headband, Candy Cane, Warm Cocoa Mug and silly Christmas Spectacles!
Materials


Candy Cane Photo Prop


Warm Cocoa Mug

Christmas Spectacles

 And there you have it! Now you have your very own set of handmade felt Holiday Party Photo Props to add some extra festive fun to your next get together! We hope you had fun along the way and enjoyed this tutorial. Let us know what you think in the comment section below or tag us on social media so that we can check them out. Happy Holidays!
Materials
- Reindeer Antlers PDF Template
- Candy Cane PDF Template
- Spectacles PDF Template
- Cocoa Mug PDF Template
- Felt Remnants in varying thicknesses
- Scissors (for fabric and paper)
- Tape
- Marker
- Wire cutters
- Utility knife
- Cutting mat
- Hot glue gun with hot glue gun sticks
- Sewing machine (optional)
- 18–20-gauge wire
- Headband
- Wooden sticks
- Pipe cleaners
- Sequins (or any embellishment you like!)
Reindeer Antlers Headband
- Print out template. Cut it out and tape the pieces together.
- Trace template onto your felt. I used 5mm thick felt for this. Then, cut out your traced antler shapes. For the 5mm felt, use a good utility knife and exercise lots of caution and patience. It’s a thick felt to cut through so just be careful and take your time!
- Now is the time to add embellishments like sequins, bells, buttons or anything else that you may want to sew on. If you wait until the end, it will be very difficult to sew through 10mm of felt and dodging wire and hot glue since we will be closing up each antler like a sandwich; plus, the stitches will be visible from the back! So do it now for a nice clean look to finish. (Spoiler alert: I made this mistake).
- Glue wire along the contours of the antlers. If you can still see any marker, make that be the inside so you can hide it.
- Add hot glue to the underside of the headband where the antler will attach. Now quickly before the hot glue dries, place the centre of the long antler shape on that hot glue and bring the two antler shapes together like a sandwich. Apply a generous amount of hot glue at the base here where the felt meets the headband. Hold this closed very tightly while the glue dries.
- Continue gluing the edges together and hold closed while it dries.
- Repeat for the other antler and voila! You’re done!
Candy Cane Photo Prop
- Print and cut out paper template. Trace and cut out the shape onto your felt. Since these props are all double sided, you will need 2! Flip the template over and cut the other one as the mirror image.
- Cut out the stripes from the paper template and choose which ones you want to use as your stripes. P.S. for this one I used regular thickness premium craft wool felt, which you can just use scissors to cut through.
- Trace these stripe shapes onto your alternate colour and cut them out. It’s important to keep track of which pieces are what. I found it helpful to place my white pieces next to the paper templates as I cut them out.
- Glue the white stripes to the candy cane. I then took this to my sewing machine to give it a nice, stitched edge detail. This is optional! Repeat for the reverse side candy cane. Trim any excess.
- Glue wire along the edges of just one of the candy canes. This will ensure it will stay upright in its shape and not floppy. Glue a wooden dowel/stick to this same shape.
- Glue on the other candy cane to seal it all up neatly and you’re done!
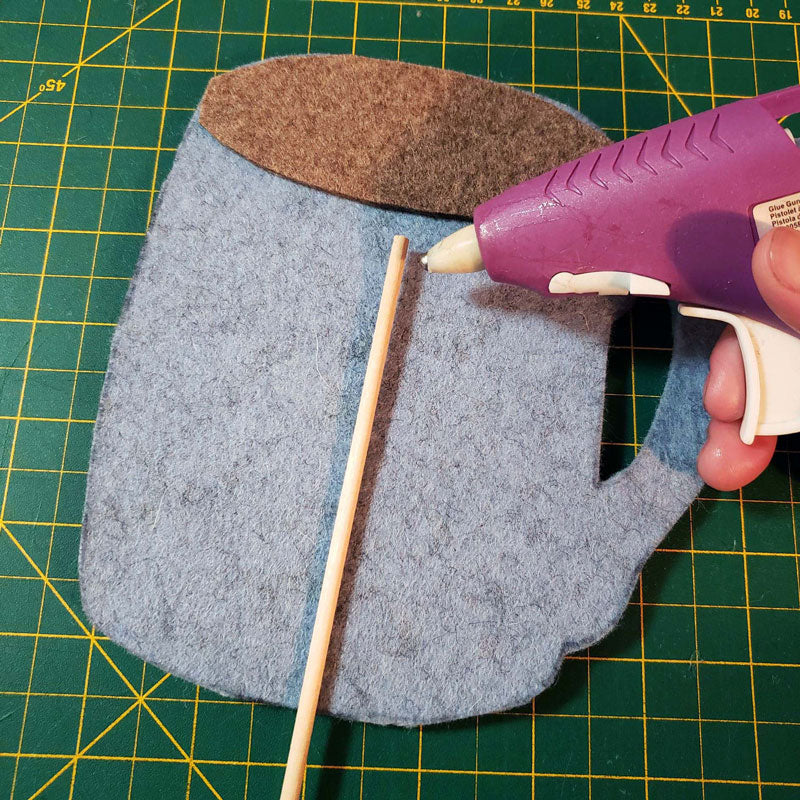
Warm Cocoa Mug
- Print out the paper template. Cut it out and trace it onto felt of your choosing. For this craft, I used 3mm thick felt for the front and 2mm for the back. That being said, be sure to cut one mug on the flip side to use as the backing.
On a different colour, cut out 4 of the little star shapes. Don’t forget to cut out the little oval from the template for the cocoa inside the mug, making sure to cut it slightly bigger than that oval so you have room to glue it to the other pieces.
- Glue on the stars to your front piece as you like. Glue on the oval behind the oval hole on the front piece. Glue on the wooden stick in a spot that gives you enough of the stick to have as a handle.
- Glue on the other mug shape to close everything up. Your cup of Cocoa is served!
Christmas Spectacles
- Print out the paper template and use it to trace out the spectacles onto felt. Like the Cocoa Mug prop, I used 3mm for the front and 2mm for the back. Cut 2 glasses shapes (this time the reverse side doesn’t matter since this shape is symmetrical).
- Glue wire along the contours of the thicker felt glasses.
- Glue a wooden stick to one side of this same felt piece. Next, glue on the thinner felt to seal it all up.
- Add any decorations you like! Pipe cleaners, sequins, jingle bells, anything you can think of! I added a little Santa hat from smaller remnant scraps I had. Let your creativity soar!
Leave a comment